Thursday, 18 April 2013

Shaving cream silliness


Shaving cream silliness

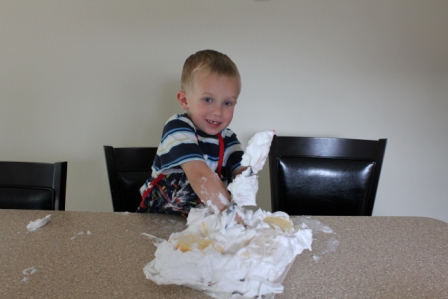
One can usually tell how successful an activity is with children if they ask or talk about it for days afterward.  Aidan and I managed to make a can of shaving cream last for three days, even when I let him have free reign over it!  I've let him use shaving cream in the bathtub before but had been meaning to use it for this activity for some time, I just had not gotten around to it until recently.


A former co-worker of mine and I did this with some teachers in a series of training's we were doing on a curriculum that emphasizes the importance of play.  To bring our point across to them we had them experience a variety of activities themselves, this particular one was a big hit!  All you need is a tray, pan, or cookie sheet, several different scraping or spreading utensils, a large sponge, and shaving cream!  


You'll notice I cut the sponge.  We talked about how things can be divided up into pieces, like pizza, pie, and cake!  I told him that he had a whole sponge to frost, but that when I cut it he now had two halves, and when I cut it again he had fourquarters.  A little math vocabulary for the day.  


He proceeded to spread and frost each sponge separately and together.


He decided he needed more shaving cream to get the job done properly.


Then hands seemed to get the job done better.


Who can resist the feel of shaving cream squeeze between their fingers?  I joined in on the fun at this point!


We took the shaving cream outside on another day where he tried out a different approach.


He started spreading each piece with the shaving cream, then stacked them....


and he discovered layering!

Sunday, 14 April 2013

Garden play dough fun


Garden flower play dough

IMG_8971-001
Often we look for ways to bring the outside in, so we can keep a connection with nature in our play. On those rare English days when the sun is shining and summer is positively blooming it’s time to do a swap and take some of our indoor play things outside. Here’s how we combined the garden’s ingredients with some sensory and imaginary play this week: garden flower play dough.
IMG_8936

Garden flower play dough recipe

We started off by picking some flowers and leaves from the garden. We have nasturtiums overflowing everywhere right now. The children have grow them from seed and they are weaving their way out of baskets, over borders and peeping out from nooks and crannies all over the garden. (Followers of our Facebook page will have seem them for sale in the wheelbarrow at our School Gardening Club stall at the summer fair.)
Nasturtiums are great plants for kids: easy to grow, beautifully coloured flowers and interesting leaves, a favourite place for butterflies to lay their eggs, and edible – both leaves and flowers – so a very pretty addition to a plate of salad.
IMG_8955
The leaves have a wonderful spicy scent making them a good sensory addition, chopped up and added to a batch of green play dough made using our favourite no cook play dough recipe.
IMG_8964-001
Of course once we moved out into the garden the children wanted to add more flowers in the mix: calendulas, chives, cornflowers and wallflowers
IMG_9000
Here’s B’s flower world, where she’s used the play dough to create caves for the fairies to live in. All the time she’s using her imagination and telling the tale of her play, she’s also getting the sensory benefit from the texture and smell of the dough and flowers ~ a lovely way to spend some after school time.
flower play dough
L made cakes. ‘If you were are fairy Mummy, this is what you would have for tea.’
flower play dough
Remembering the play dough mandalas we made last week using lentils we also made some flower petal versions.
flower play dough
When the sun shines you need to seize that day and delight in the scent, colour and textures of the garden.

Printing with flowers for spring


Beautiful flower printing craft

flower printing
Ever tried printing with flowers?
flower painting
Dip and print – it couldn’t be easier. The flower stalks were like little fairy wands, dabbing paint onto the paper.
flower craft ideas
Little finger prints make great stems too (and who can resist putting putting their hands in the paint?)

Friday, 5 April 2013

Spring time bloom print with broccoli


Broccoli Print Blossom Trees


Over the weekend the trees have suddenly started to blossom and a certain little girl is totally enamoured with them because they are PINK! Wherever we walk or drive a little voice chirps up every few moments “Ooo look, another pink tree!” I’m in love with the awe and wonder that comes with this stage of childhood and wish it would never end.
We did a little art project to make our own pink trees for displaying inside and used half a broccoli stem and some finger paints! I’ve been wanting to see what effect you can make from printing with broccoli for a while, but now that spring is here the time seems right so we tried it out and it works really well!
You need to cut a broccoli stem in half, from top to bottom. Cut it as straight and evenly as possibly so that when it lies facing downwards it lies completely flat on the paper.
Dip it into brown paint, lift up and press evenly onto paper to create a perfect tree print! (If you don’t have brown paint mix red, blue and green together.)
Cute! Now we wanted to add pink blossoms as that is all that is showing on the trees at the moment, so C dipped her finger tips into two shades of pink paint and dotted the blossoms all over the tree branches. If you want to add leaves then use green too!
One wasn’t enough so she went on to make some more backed onto different colours for contrast.
The finished prints!
This one has lots of blossoms blooming on its trunk too, so it seems :-)
And here are all four set out together. It would be lovely to make a four seasons version of this for each stage of the year, from bare branches to blossoms, leaves and fruit to snow-laden!
This activity is good for:
* creativity, imagination and experimenting with a range of tools and media
* manipulation of small tools/ materials (fine motor skills)
* science: talking about seasons/ growing/ spring/ life-cycles/ flowers

Pretzel party


Party Pretzels

Prep. time 20 min; Cook time 10-15 min

These Party Pretzels are a great kids recipe and would be a fun activity for a play group or party. Who can make the most unique pretzel shape?
You can use coarse salt, or none at all if you want to reduce sodium.

Level of Difficulty: Moderate 

Make this easy for preschoolers by making the dough and 'rolling' it into thin 'ropes' they can use the ropes to make what ever design they choose.

Here's what you'll need...

1 Tablespoon active dry yeast
(1 pkg)
½ cup lukewarm water
2 eggs, beaten
½ cup oil
1 cup milk
1 teaspoon salt
5 ½ cups all purpose flour
⅓ cup sugar
1 egg beaten
3 tablespoons coarse salt (optional)

Here's how to make them...
1. In a large bowl, dissolve the yeast in the lukewarm water and stir in the eggs, oil and milk.
2. In a separate bowl, combine all of the dry ingredients and then add to the egg and oil mixture.
3. Knead for 5-10 minutes until the dough is smooth and rubbery.
4. Roll the dough into ropes, about the diameter of an adults' pinky finger, and about 30 - 60 cm long.
5. Now it's time to be creative, make as many different pretzel shapes and designs you can. Place each shape on a greased (or parchment lined) baking sheet.
6. Brush the tops of each shape with egg and sprinkle with salt if you choose. Bake at 218 deg celcius for 10-15 minutes. Then enjoy!! 

Marshmallows on a Stick


Marshmallows on a Stick

These marshmallows on a Stick are a great treat for camping, sleep over or just for a fun tasty snack anytime! 
Level of Difficulty: Easy to Moderate 


Here's what you'll need...
• 340g bag chocolate chips
• Marshmallows
• tea biscuit crumbs or sprinkles
• Craft sticks
• Wax paper


Here's how you make them...
1. Push a craft stick into each marshmallow. Don't push it all the way through, but push it in as far as you can. 

2. Melt your chocolate chips in a small sauce pan over low heat, stirring frequently. Once your chocolate chips are all melted and runny, remove from heat and dip and swirl each marshmallow into the chocolate. Place marshmallows on a wax paper-lined plate. 

3. While your chocolate is still wet you can either sprinkle the biscuit crumbs over top, or put your crumbs in a bowl or paper plate and roll your marshmallows in them.
Refridgerate for at least 1/2 hour or until the chocolate is set. Cover if you are storing these.
One 12oz bag of chocolate chips will make about 12-15 smores.
It's really important not to over melt your chocolate chips, otherwise they will "cook" and get too hard for dipping. If you have a double boiler it would work even better for dipping! 

Rainy Day Fun for Ages 3 and Up


Rainy Day Collage

You don't need to make this Rainy Day Collage only on a rainy day, it's a great craft for spring time or when learning about the weather. A great craft for Preschoolers and kindergartners!

Ages: 3 and Up 
Here's what you'll need...
• Q tips
• Small container
• Plate (microwave safe)
• Blue food coloring
• Construction paper
• Pipe cleaner
• Glue
• Scissors 
Here's how you make it...
1. First you will need to make your rain drops. Break the ends off of a bunch of Q Tips. Put a small amount of water in a small container and add 6-8 drops of blue food coloring. Dip your Q Tips into the water and lay on a plate. If you are making these a day or so ahead of time you can leave your Q tips out to dry overnight. If you need them right away you can put them in the microwave, on high, for 5-6 minutes or until they are dry. 
2. Cut out a construction paper umbrella and make your handle with a piece of pipe cleaner. 
3. Decorate your umbrella any way you wish. We used glitter glue and markers, you can use anything you have around the house or classroom... stickers, stamps, paint, sequins, be creative! Once you're finished, glue your umbrella and handle onto a piece of blue construction paper. 
4. Glue on your blue Q Tip raindrops and you're all finished!
Another option for this collage is to add some cotton ball clouds up on top. 

Home made Bird breakfast feeder


Breakfast Birdfeeder

The Breakfast Birdfeeder is an easy homemade birdfeeder craft that even toddlers can create. It's a great way to help you child invite birds into your yard! 


Level of Difficulty: Easy

Here's what you'll need...
•Stale bread or toast
•Cheerios, or any round shaped cereal
•String / yarn
•Scissors
•Pen or Pencil


Here's how you make it...
1. With a pen or pencil punch holes into your bread slices and if not toasted, leave out until stale (overnight).
2. Using your yarn, string together the bread crusts and cereal and find a great place to hang it in your favorite tree! Soon you will have some little friends in your yard!


Pinecone Birdfeeder

The Pinecone Birdfeeder is an easy way to invite birds into your yard! Search around your yard or neighborhood for some pincones and the rest you'll probably find in your pantry!

Level of Difficulty: Easy to Moderate


Here's what you'll need...
•Pine cone (bigger is better)
•Peanut butter and something to spread it with
•Seeds, either bird feed or sunflower seeds/nuts
•Yarn and scissors to cut
•Paper plate 

Here's how you make it...
1. Tie your yarn around your pinecone and then tie it again at the top so that you can hang it on your favorite tree. 

2. Smear peanut butter into the groves of the pine cone, pour some seeds onto a paper plate and roll the cone around to coat it.

3. Hang it in your favorite tree, try and hang it by a strong branch so the birds have somewhere to perch! Hopefully soon you'll have some new friends arrive for a visit! 


Fun Spring time activities... Butterfly Baggies


Butterfly Baggie

This butterfly Baggie is just that - a butterfly made from a regular zip-lock baggie! If you can crumple paper, you can do this craft, perfect for toddlers and preschoolers!


Ages: 2 and Up

Here's what you'll need...
• Zip-lock baggie
• Construction paper
• Pipe cleaner
• Scissors 

Here's how you make it...
1. Cut the top off the baggie that sticks up above the zipper. 

2. Cut construction paper into squares, crumple them and place them inside the baggie. Fill the baggie about ⅔ full. 

3. Squeeze out the air in the baggie and seal it tight. Gather it in the middle and wrap and twist a pipe cleaner around the center. Twirl the ends to make the butterfly's antennas.
There are other ways to do this craft. You can slide flat pieces of paper inside the baggie, fold the baggie accordion-style and secure with a pipe cleaner. You can also use a clothespin for the center rather than a pipe cleaner.