Monday, 14 October 2013

Bread Recipe - Baking bread with our little treasures

A link to what children learn when baking.

(click on link above)

How our children made bread ... Recipe at the end of the pictures

result !


Bread Recipe

225g whole meal bread flour
1 sachet dried yeast
15g soft margarine
150 ml warm water
1 tsp salt
1 tsp sugar

1. Put flour, sugar and salt in a bowl
2. Add margarine and run in with fingertips
3. Add yeast
4. Add water and stir in with a spoon
5. Make into dough and knead for 5 minutes. 
6. Leave dough in warm place to rise for 30 minutes

7. Make into rolls or shape of child's choice and cook in oven at 230 c for 15-20 minutes.

Have fun and LIKE our FACEBOOK page for more up dates

Monday, 7 October 2013

Gingerbread biscuit recipe - What do kids learn when they bake?

Gingerbread biscuit recipe - What do kids learn when they bake?

Baking with kids can be lots of fun and rather messy! But many people don’t realise that amongst all the mess, their kids are developing skills that are needed for school!
In the kitchen, we use maths skills (measuring, counting), visual perceptual and spatial perceptual skills (pouring, fitting biscuits on a tray), and lots of coordination skills.
Math skills are also boosted as children count out ingredients (eg 6 eggs, 2 cups flour), and also as they measure and weigh the ingredients. We also get our kids to practice counting

So grab an apron and lets get baking! With kids, things can get a little messy, but persevere and the mess gets less as they develop their skills. It does help if you have a nice covered outdoor area, where your kids can mix the ingredients on a table! But really, truly, the fun they will have, and the skills they learn, far outweigh the temporary mess! 

Gingerbread biscuit recipe

350g plain flour
1 tsp bicarbonate of soda
2 tsp ground ginger
1 tsp ground cinnamon
125g butter
175g soft brown sugar
1 egg
4 tbsp golden syrup
Chocolate chips to decorate

1. Sift flour, bicarbonate of soda, ginger, and cinnamon into a bowl. 

2. Add butter and make into breadcrumbs.

3. Stir in the sugar

4. Beat egg and golden syrup and add to the mixture. 

5. Decorate with chocolate chips

6. Cook in the oven at 180c for 12-15 minutes. 


Some pictures of our Gingerbread bunnies and us making them ... 


Wednesday, 24 July 2013

Home made Bubble recipes to try...


How to make bubble wands from pipe cleaners
bubble rope made from straw and rope


Summer bubble fun ! 
Home made Bubble recipes to try... 
Cheap and easy... 
What to do when its hot ?!
Simple Bubbles

What You Need:
  • One cup of water
  • Two tablespoons liquid detergent
  • One Tablespoons glycerin (available at drug stores)
  • 1/2 tablespoon sugar
What You Do:
  • Mix together and use.
Giant Bubbles
What You Need:
  • Six cups water
  • 3/4 cup corn syrup
  • Two cups dishwashing liquid
What You Do:
  • Mix together and let sit 4 hours before using.
EZ Bubbles
What You Need:
  • 1/2 C. Water
  • 1/2 C. Liquid Detergent
  • One Tablespoon Cooking Oil
What You Do:
  • Mix together and use.
Colorful Bubbles
What You Need:
  • One cup granulated soap or soap powder
  • One quart warm water
  • liquid food coloring
What You Do:
  • Dissolve soap in warm water. Stir in food coloring. Use.
Gargantuan Bubbles
What You Need:
  • One Cup Warm Water
  • 1/4 Cup Blue Dishwashing Liquid
  • One Tablespoon Salt
easy to make bubble blow tools - one empty water bottle
What You Do:
  • Combine all ingredients. Mix well until salt dissolves. Use.


Get the paddling pool out and add the mixture to the pool - get a hoola hoop and make Giant Bubbles


Tuesday, 4 June 2013

Wood work in the classroom

See what we have been up to lately ... 
Why Woodworking?As children explore with tools and wood, they will use large and small muscles. Sawing, for example, requires large movement, while holding a screw in place requires small-muscle coordination. As children make decisions about design, shape and type of wood to use, they participate in problem-solving skills. If children are working together to saw a piece of wood to build a bridge, they practice social skills. These skills may carry over into real-world settings (Skeen, Garner, & Cartwright, 1984).
Woodworking also allows children another avenue for creativity. When children are provided with enough materials, technical assistance, and limits, they can experiment as they wish. As they become more skillful, they can use more advanced tools and develop their ideas accordingly. It is important, however, that children not be required to imitate models provided by others. Children may become frustrated when their resulting product does not resemble the model provided; they may give up rather than explore other possibilities. Remember, the planning and building process is more important that the finished product.
As children successfully complete their projects, even if the project is sawing a piece of wood in two, they are building self-esteem. When they use their constructions in other play episodes their self-esteem is enhanced. Children's work does not have to be complete in order for them to feel a sense of accomplishment. As with other successes, seeing some progress can keep a child going


working with different tools

hard at work

result of hard work 


Thursday, 18 April 2013

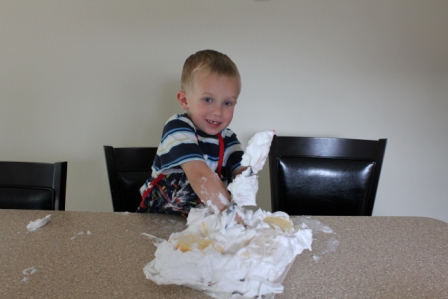
Shaving cream silliness


Shaving cream silliness

One can usually tell how successful an activity is with children if they ask or talk about it for days afterward.  Aidan and I managed to make a can of shaving cream last for three days, even when I let him have free reign over it!  I've let him use shaving cream in the bathtub before but had been meaning to use it for this activity for some time, I just had not gotten around to it until recently.


A former co-worker of mine and I did this with some teachers in a series of training's we were doing on a curriculum that emphasizes the importance of play.  To bring our point across to them we had them experience a variety of activities themselves, this particular one was a big hit!  All you need is a tray, pan, or cookie sheet, several different scraping or spreading utensils, a large sponge, and shaving cream!  


You'll notice I cut the sponge.  We talked about how things can be divided up into pieces, like pizza, pie, and cake!  I told him that he had a whole sponge to frost, but that when I cut it he now had two halves, and when I cut it again he had fourquarters.  A little math vocabulary for the day.  


He proceeded to spread and frost each sponge separately and together.


He decided he needed more shaving cream to get the job done properly.


Then hands seemed to get the job done better.


Who can resist the feel of shaving cream squeeze between their fingers?  I joined in on the fun at this point!


We took the shaving cream outside on another day where he tried out a different approach.


He started spreading each piece with the shaving cream, then stacked them....


and he discovered layering!

Sunday, 14 April 2013

Garden play dough fun


Garden flower play dough

IMG_8971-001
Often we look for ways to bring the outside in, so we can keep a connection with nature in our play. On those rare English days when the sun is shining and summer is positively blooming it’s time to do a swap and take some of our indoor play things outside. Here’s how we combined the garden’s ingredients with some sensory and imaginary play this week: garden flower play dough.
IMG_8936

Garden flower play dough recipe

We started off by picking some flowers and leaves from the garden. We have nasturtiums overflowing everywhere right now. The children have grow them from seed and they are weaving their way out of baskets, over borders and peeping out from nooks and crannies all over the garden. (Followers of our Facebook page will have seem them for sale in the wheelbarrow at our School Gardening Club stall at the summer fair.)
Nasturtiums are great plants for kids: easy to grow, beautifully coloured flowers and interesting leaves, a favourite place for butterflies to lay their eggs, and edible – both leaves and flowers – so a very pretty addition to a plate of salad.
IMG_8955
The leaves have a wonderful spicy scent making them a good sensory addition, chopped up and added to a batch of green play dough made using our favourite no cook play dough recipe.
IMG_8964-001
Of course once we moved out into the garden the children wanted to add more flowers in the mix: calendulas, chives, cornflowers and wallflowers
IMG_9000
Here’s B’s flower world, where she’s used the play dough to create caves for the fairies to live in. All the time she’s using her imagination and telling the tale of her play, she’s also getting the sensory benefit from the texture and smell of the dough and flowers ~ a lovely way to spend some after school time.
flower play dough
L made cakes. ‘If you were are fairy Mummy, this is what you would have for tea.’
flower play dough
Remembering the play dough mandalas we made last week using lentils we also made some flower petal versions.
flower play dough
When the sun shines you need to seize that day and delight in the scent, colour and textures of the garden.